Thursday, August 18, 2016

Greenway Art Festival

I'm very excited to be a Vendor at the Greenway Art Festival this year!

I have been enjoying the art of Book Binding, something I learned years ago and put away until "a later date". This is the later date! and I am ready to show off some of my books. I feel like this year has been a time of experiment and practice and this year at the Greenway I have the opportunity to present my craft to the community. Of course the books will be for sale (I 'need' some Book Binding tools). So here is a sampling of what I will have at the Greenway Art Festival:


The above 4 are made with Graphic 45 and Canson papers. The 'aging' is Bronze and Gold ink. The two bigger ones measure 7.25" x 8.5" and the pages are lined (my page design). the smaller ones measure 4.25" x 5.75" (their pages are blank). All have an inside pocket. The larger ones have a string closure.


Here's a fun journal! The pages are post bound so you can add or remove pages. The cover is Graphic 45 paper, the spine is black denim fabric. The pages have been stained and washed so they have an aged appearance. You can use pen, marker and most other sketching/drawing mark makers you want. You could us photo corners and add pictures.


And this little volume of 4. How sweet! The spines and Book case is covered with a wonderful repurposed soft leather! The pages are ivory paper and blank. They are stinking cute at 2.75" x 2.25"

There's more! I hope to see you on the Greenway.


Friday, July 24, 2015

Working up some Fall goodies with Rag Yarn!

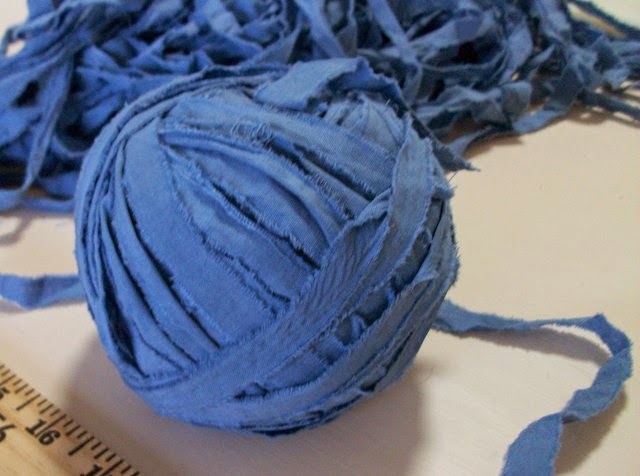
So here's how I did it. First off the rag yarn you can get here: Fine Linen and Scarlett.etsy.com (my etsy shop of course ;) OR You can make your own. For each ball of approximately 65 yards you will need 1 yard of 100% cotton fabric. 

Snip from cut edge of fabric just inside the salvage edge (about 1/2 inch) and tear the edge off. Snip into the cut edge of the fabric again (1/2 inch from salvage edge) and tear! Strip the entire yard into 1/2 inch strips. I like to strip the fabric one strip from one end then the other, the crosswise threads in your fabric will stay stronger this way; tearing all strips from one end weakens the crosswise threads too much. There will be lots of loose threads to gather up!
I have my sewing machine up at all times so it's easy for me to stitch the strips end to end by machine. To do that I choose a matching color tread and turn my stitch length short, on my machine that is about 2.5. If you don't have a sewing machine it is easy enough to secure the ends together with a few hand stitches. I prefer stitching rather than knots and slits because it is very smooth to crochet or knit over.

Cornucopia! 10 inches long and 7 inches across the opening.
1 ball of Rag Yarn will make this Cornucopia.


I haven't written crochet or knitting patterns for anyone except myself....I'm working on patterns for the Cornucopia and Candy Corn. I assure you I will not offer the patterns until I have them right and readable! Until then you can use the cornucopia pattern from Lion Brand (if you click on that a new window will open, you may need to sign in to see the pattern but it is a free download). I did change up the pattern to make the ridges and make it longer but the one they offer is cute. REMEMBER the rag yarn is going to make up bigger and I used an L-8.00mm crochet hook. Just a side note: I like the Boye brand hooks for rag yarn because they have a pointier hook end than other brands and can slip easier though the rag yarn as it does not have the stretch of spun yarns.


Candy Corn! 7 inches tall, bottom diameter is just over
7 inches, the top opening is 4 inches in diameter.
You can make this with one ball of each color with
plenty of yarn left over for mug mats or even another
Candy Corn basket.

The Candy Corn pattern....Let me just say, if you know how to work up a circle for a coaster, basket bottom, work the circle to 2sc every 9th stitch. Now work up the sides (stop increasing). I worked 4 rounds of yellow. Change your color, work one sc round. The next round decrease 3 stitches evenly around. Work a sc round and a decrease round 8 times. Now change color again. Work the same 8 rows, sc a round, decrease a round, decreasing 3 evenly. And your done!

hAVe fUN AND tHANk yOu fOR sToPPiNg bY!


Monday, July 20, 2015

Here we are in the middle of summer! I have enjoyed time with my family and have had the opportunity to meet new friends.

I have been taking an Art Journal class with the wonderful local artist Dawna Kinne Magliacano 

Here are some of my Journal pages:
When I started the classes I thought it would be nice to make it a memory journal of my Mother; we are so much a like and there's not a day goes by I don't think of her at some point.

Bobby Darin and the fashions were from her prime...she lived on Lake Michigan (Chicago). I was surprised how this page evolved.

 By the next week I realized what my Mother, Bernice would want me to do is enjoy being creative/artistic and move forward with it, knowing she was right there with me in spirit.


So my next page was a good-bye to the past so (we) could move on in adventure and discovery.


   The little picture is my Aunt Lois, Grandmother (Bernice) and Mother, also named Bernice. They were standing in front of the Lincoln Park Zoo the (used to be) in Chicago Illinois, her home town. The phrase at the bottom was written on the back of the picture, it reads "Remember our Easter Outfits"...because they made them! Besides being a creative/artist these three women were incredible seamstresses...my life instructors.

Here are three more pages to follow this Art journaling adventure:


Sunday, March 15, 2015

I love spring!

This is a lovely Sunday in middle Tennessee. I have Daffodils up. That beautiful yellow is so welcome this time of year....Just reminds me of this beautiful silk "hankie" I got at the yarn shop yesterday.
I went in for a part for my spinning wheel and saw later that day there would be a class using the lovely fiber. You can knit with it right from the batt (hankie) or spin it first. You can learn more about this at the Knaughty Knitter

Wednesday, February 11, 2015

Projects with Rag Yarn


My latest projects have been with the rag yarn. 

It has been fun experimenting with it, the baskets are always fun, and pretty quick to work up. 


The Granny Squares are a simple design and could easily be sewn together for an interesting rug.  


The table mat is pretty quick too, this one is in Christmas colors, I'll make one up in the spring colors
hat I have been listing in my etsy shop.


I am using Kona Cotton fabric. It is a very nice quality, washes well and keeps it's vibrant colors! It tears straight on the grain, with a softly frayed edge, which gives a nice vintage look.


Thursday, July 17, 2014

Dying for Rag Yarn

Rag Yarn is Such an Interesting Medium

This all started with the bath mat I made from the old sheet, it wears so well and is machine washable and dryer safe. The fabric has become absorbent over time too.

So, because I have Muslin fabric here all the time (for my pillow inserts) I decided to tear my strips narrower and dye it. Muslin is an even weave cotton and absorbs dyes very well. 


Here I have the Federal Blue and a Bright Pink, they will look darker in the dye bath. With these batches I started with fabric that has already been stripped. There is a little less drama in the untangling  if I dye the fabric before stripping!
I have been testing for gauge and color fastness of the rag yarn. It is washable and dryer safe. Below I have a couple pictures that show gauge. The white is in stockinette stitch on a US13 needle is 11 stitches and 12 rows to a 4 inch by 4 inch swatch. The sample you see in the next picture is knit on a US15 needle, the gauge is 12 stitches and 14 rows to a 4 inch by 4 inch swatch.

 
If you like to knit or crochet, have some fun with different fibers. For fun here are some links with rag yarn ideas:  Creativejewishmom.com      bethsco.com   

Thursday, September 19, 2013

Where did this name come from?

Fine Linen and Scarlet is the name I use to represent my service as a seamstress. This was born at a time of need and will stay with me forever. 

The craft of sewing and my love of the craft has carried me through many times of need, it is a way of life I learned at a very early age. It has followed me for many years, never goes away and sometimes wells up like the sun bursting over the horizon.

The name Fine Linen and Scarlet comes from my favorite passage in the Bible (Proverbs 31), it is the description of a woman of noble character. She makes linen garments and sells them. She is not afraid of the snow (winter; difficult times) because all in her household are clothed in scarlet.
This woman of Proverbs 31 has been a beautiful role model for many years.